.
在类没有完全初始化之前,你不能使用他,使用他包含访问属性、设置属性、调用方法。
本篇主要讲解结构体的初始化,结构体会在没有自定义初始化方法的情况下自动为所有的stored properties函数创建默认的初始化方法,但是如果你自己提供了初始化方法,那么自动的初始化方法就会失效,但是也可以把自定义的初始化方法写在扩展中这样编译器还是会为主体的结构体创建默认的初始化方法,默认创建的初始化方法你不能更改初始化参数的顺序,系统默认根据你在结构体写的顺序来创建。
对于optional的值不需要在初始化方法中赋值,因为optional的方法默认会赋值为nil。
你也可以为Init方法为需要传入参数设置默认值,这样你在创建的时候就可以直接调用(),而不是需要传入其他的值。当因为传入的值不一样而有多个Init方法的时候,这时候就可以用delegating initializer方法来解决。delegating initializer在网络框架Alamofire里面大量被使用,例如用户如果不指定请求方法默认就会使用get方法,不指定配置就使用默认的配置。
对于传入参数不合法,init方法可以通过Optional和throws两种方法来告诉初始化失败。
Some things are inherently awesome: rockets, missions to Mars, initialization in Swift. This tutorial combines all three for a combo-platter of awesomeness in which you’ll get to learn about the power of initialization!
Initialization in Swift is about what happens when you create a new instance of a named type:
1 | let number = Float() |
Initialization is the time to manage the inital values of stored properties for named types: classes, structures, and enumerations. Because of the safety features built into Swift, initialization can be tricky. There are a lot of rules, some of which are not obvious.
By following this two-part tutorial, you will learn the ins and outs to designing initializers for your Swift types. In Part 1, you’ll begin with the basics including structure initialization, and in Part 2 you’ll move on to learning about class initialization.
第一部分包含结构体的初始化,第二部分包含类的初始化。
Before getting started, you should be familiar with the basics of initialization in Swift and be comfortable with concepts such as optional types, throwing and handling errors, and declaring default stored property values. Also, make sure you have Xcode 8.0 or later installed.
If you need a refresher on the basics, or if you are just starting to learn Swift, check out our book Swift Apprentice or our many Swift intro tutorials.
Getting Started
Let’s set the scene: it’s your first day on your new job as a launch software engineer at NASA (go you!). You’ve been tasked with designing the data model that will drive the launch sequence for the first manned mission to Mars, Mars Unum. Of course, the first thing you do is convince the team to use Swift. Then …
Open Xcode and create a new playground named BlastOff. You can select any platform, since the code in this tutorial is platform-agnostic and depends only on Foundation.
在类没有完全初始化之前,你不能使用他。使用它包括,访问属性,设置属性,调用方法。
Throughout the tutorial, remember this one golden rule: You cannot use an instance until it is fully initialized. “Use” of an instance includes accessing properties, setting properties and calling methods. Everything in Part 1 applies specifically to structures unless otherwise specified.
Banking on the Default Initializer
To start modeling the launch sequence, declare a new structure named RocketConfiguration in your playground:
1 | struct RocketConfiguration { |
Below the closing curly brace of the definition for RocketConfiguration, initialize a constant instance named athena9Heavy:
1 | let athena9Heavy = RocketConfiguration() |
当结构体或者类里面没有需要初始化的存储参数,或者所有的值都提供了默认的存储参数的时候,可以用系统默认听的初始化方法也就是用()来初始化。
This uses a default initializer to instantiate athena9Heavy. In the default initializer, the name of the type is followed by empty parentheses. You can use default initializers when your types either don’t have any stored properties, or all of the type’s stored properties have default values. This holds true for both structures and classes.
Add the following three stored properties inside the struct definition:
1 | let name: String = "Athena 9 Heavy" |
Notice how the default initializer still works. The code continues to run because all the stored properties have default values. That means the default initializer doesn’t have very much work to do since you’ve provided defaults!
What about optional types? Add a variable stored property named numberOfStageReuseLandingLegs to the struct definition:
1 | var numberOfStageReuseLandingLegs: Int? |
In our NASA scenario, some of the rockets are reusable, while others are not. That’s why numberOfStageReuseLandingLegs is an optional Int. The default initializer continues to run fine because optional stored property variables are initialized to nil by default. However, that’s not the case with constants. 对于Optional的值系统默认会给nil的值。所以仍然可以用默认的初始化。
Change numberOfStageReuseLandingLegs from a variable to a constant:
但是如果把var改为let,编译器就会报错。
1 | let numberOfStageReuseLandingLegs: Int? |
Notice how the playground reports a compiler error:

You won’t run into this often, since constant optionals are rarely needed. To fix the compiler error, assign a default value of nil to numberOfStageReuseLandingLegs:
将nil赋值给numberOfStageReuseLandingLegs,这样的赋值没有意义,后面也无法在对这个值进行修改。只是满足了编译器
1 | let numberOfStageReuseLandingLegs: Int? = nil |
Hooray! The compiler is happy again, and initialization succeeds. With this setup, numberOfStageReuseLandingLegs will never have a non-nil value. You cannot change it after initialization, since it is declared as a constant.
Banking on the Memberwise Initializer
Rockets are usually made up of several stages, which is the next thing to model. Declare a new struct named RocketStageConfiguration at the bottom of the playground:
1 | struct RocketStageConfiguration { |
This time, you have three stored properties propellantMass, liquidOxygenMass and nominalBurnTime with no default values.
Create an instance of RocketStageConfiguration for the rocket’s first stage:
1 | let stageOneConfiguration = RocketStageConfiguration( |
None of RocketStageConfiguration‘s stored properties have default values. Also, there is no initializer implemented for RocketStageConfiguration. Why isn’t there a compiler error? Swift structures (and only structures) automatically generate a memberwise initializer. This means you get a ready-made initializer for all the stored properties that don’t have default values. This is super handy, but there are several gotchas.Swift自动会为Struct自动创建为每个stored properties的属性创建numberwise initializer方法。
Imagine you submit this snippet for code review and your developer team lead tells you all properties should be ordered alphabetically.
Update the RocketStageConfiguration to re-order the stored properties:
1 | struct RocketStageConfiguration { |

Struct自动生成的numberwise initializer方法只会按照你的写的参数的顺序生成。调换顺序是不行的。
What happened? The stageOneConfiguaration initializer call is no longer valid, because the automatic memberwise initializer argument list’s order mirrors that of the stored property list. Be careful, because when re-ordering structure properties, you might break instance initialization. Thankfully the compiler should catch the error, but it is definitely something to watch out for.
Undo the stored property re-order change to get the playground compiling and running again:
1 | struct RocketStageConfiguration { |
All your rockets burn for 180 seconds, so it’s not useful to pass the nominal burn time every time you instantiate a stage configuration. Set nominalBurnTime‘s default property value to 180:
1 | let nominalBurnTime: Int = 180 |
Now there’s another compiler error:

因为memberwise initializers只为没有默认值的stored properties提供初始化方法,一旦你提供了默认值,那么这个值就会从初始化方法中剔除。
Compilation fails because memberwise initializers only provide parameters for stored properties without default values. In this case, the memberwise initializer only takes in propellant mass and liquid oxygen mass, since there is already a default value for burn time.
Remove nominalBurnTime‘s default value so that there is no compiler error.
1 | let nominalBurnTime: Int |
Next, add a custom initializer to the struct definition that provides a default value for burn time:
1 | init(propellantMass: Double, liquidOxygenMass: Double) { |
Notice that the same compiler error is back on stageOneConfiguration!
如果你定义了初始化方法,那么自动的初始化方法就会失效。
Wait, shouldn’t this work? All you did was provide an alternative initializer, but the original stageOneConfiguration initialization should work because it’s using the automatic memberwise initializer. This is where it gets tricky: you only get a memberwise initializer if a structure does not define any initializers. As soon as you define an initializer, you lose the automatic memberwise initializer.
In other words, Swift will help you out to start. But as soon as you add your own initializer, it assumes you want it to get out of the way.
Remove the nominalBurnTime argument from stageOneConfiguration‘s initialization:
1 | let stageOneConfiguration = RocketStageConfiguration(propellantMass: 119.1, |
All is good again! :]
But what if you still need the automatic memberwise initializer? You can certainly write the equivalent initializer, but that’s a lot of work. Instead, move the custom initializer into an extension before you instantiate an instance.
如果你既想要系统为你提供的默认的初始化方法,又想自定义的初始化方法,那么你可以把自定义的初始化方法写在扩展里面。
Your struct will now be in two parts: the main definition, and an extension with your two-parameter initializer:
1 | struct RocketStageConfiguration { |
Notice how stageOneConfiguration continues to initialize successfully with two parameters. Now re-add the nominalBurnTime parameter to stageOneConfiguration‘s initialization:
1 | let stageOneConfiguration = RocketStageConfiguration(propellantMass: 119.1, |
That works too! If the main struct definition doesn’t include any initializers, Swift will still automatically generate the default memberwise initializer. Then you can add your custom ones via extensions to get the best of both worlds.
Implementing a Custom Initializer
实现自定义的初始化方法
Weather plays a key role in launching rockets, so you’ll need to address that in the data model. Declare a new struct named Weather as follows:
1 | struct Weather { |
The struct has stored properties for temperature in degrees Celsius and wind speed in kilometers per hour.
Implement a custom initializer for Weather that takes in temperature in degrees Fahrenheit and wind speed in miles per hour. Add this code below the stored properties:
1 | init(temperatureFahrenheit: Double, windSpeedMilesPerHour: Double) { |
Defining a custom initializer is very similar to defining a method, because an initializer’s argument list behaves exactly the same as a method’s. For example, you can define a default argument value for any of the initializer parameters.
给init方法中的参数提供初始值,这样在初始化的时候可以直接用默认的值初始化。
Change the definition of the initializer to:
1 | init(temperatureFahrenheit: Double = 72, windSpeedMilesPerHour: Double = 5) { |
Now if you call the initializer with no parameters, you’ll get some sensible defaults. At the end of your playground file, create an instance of Weather and check its values:
1 | let currentWeather = Weather() |
Cool, right? The default initializer uses the default values provided by the custom initializer. The implementation of the custom initializer converts the values into metric system equivalents and stores the values. When you check the values of the stored properties in the playground sidebar, you’ll get the correct values in degrees Celsius (22.2222) and kilometers per hour (8.047).
An initializer must assign a value to every single stored property that does not have a default value, or else you’ll get a compiler error. Remember that optional variables automatically have a default value of nil.对于optional的值自动赋值为nil
Next, change currentWeather to use your custom initializer with new values:
1 | let currentWeather = Weather(temperatureFahrenheit: 87, windSpeedMilesPerHour: 2) |
As you can see, custom values work just as well in the initializer as default values. The playground sidebar should now show 30.556 degrees and 3.219 km/h.
That’s how you implement and call a custom initializer. Your weather struct is ready to contribute to your mission to launch humans to Mars. Good work!

By NASA and The Hubble Heritage Team (STScI/AURA) – Source
Avoiding Duplication with Initializer Delegation
当需要提供多个initializer方法的时候,各个方法之间只是有部分值不相同,这时候就可以通过delegating initializer来解决,delegating initializer在很多开源库里面都有应用。
It’s time to think about rocket guidance. Rockets need fancy guidance systems to keep them flying perfectly straight. Declare a new structure named GuidanceSensorStatus with the following code:
1 | struct GuidanceSensorStatus { |
This struct holds the rocket’s current and initial angular velocity for the z-axis (how much it’s spinning). The struct also keeps track of whether or not the rocket needs a correction to stay on its target trajectory.
The custom initializer holds important business logic: how to convert degrees per minute to radians per minute. The initializer also sets the initial value of the angular velocity to keep for reference.
You’re happily coding away when the guidance engineers show up. They tell you that a new version of the rocket will give you an Int for needsCorrection instead of a Bool. The engineers say a positive integer should be interpreted as true, while zero and negative should be interpreted as false. Your team is not ready to change the rest of the code yet, since this change is part of a future feature. So how can you accommodate the guidance engineers while still keeping your structure definition intact?
No sweat — add the following custom initializer below the first initializer:
1 | init(zAngularVelocityDegreesPerMinute: Double, needsCorrection: Int) { |
This new initializer takes an Int instead of a Bool as the final parameter. However, the needsCorrectionstored property is still a Bool, and you set correctly according to their rules.
After you write this code though, something inside tells you there must be a better way. There’s so much repetition of the rest of the initializer code! And if there’s a bug in the calculation of the degrees to radians conversion, you’ll have to fix it in multiple places — an avoidable mistake. This is where initializer delegation comes in handy.
Replace the initializer you just wrote with the following:
1 | init(zAngularVelocityDegreesPerMinute: Double, needsCorrection: Int) { |
This initializer is a delegating initializer and, exactly as it sounds, it delegates initialization to another initializer. To delegate, just call any other initializer on self.
Delegate initialization is useful when you want to provide an alternate initializer argument list but you don’t want to repeat logic that is in your custom initializer. Also, using delegating initializers helps reduce the amount of code you have to write.
To test the initializer, instantiate a variable named guidanceStatus:
1 | let guidanceStatus = GuidanceSensorStatus(zAngularVelocityDegreesPerMinute: 2.2, needsCorrection: 0) |
The playground should compile and run, and the two values you checked for the guidanceStatus properties will be in the sidebar.
One more thing — you’ve been asked to provide another initializer that defaults needsCorrection to false. That should be as easy as creating a new delegating initializer and setting the needsCorrection property inside before delegating initialization. Try adding the following initializer to the struct, and note that it won’t compile.
1 | init(zAngularVelocityDegreesPerMinute: Double) { |

Compilation fails because delegating initializers cannot actually initialize any properties. There’s a good reason for this: the initializer you are delegating to could very well override the value you’ve set, and that’s not safe. The only thing a delegating initializer can do is manipulate values that are passed into another initializer.
Knowing that, remove the new initializer and give the needsCorrection argument of the main initiaziler a default value of false:
init(zAngularVelocityDegreesPerMinute: Double, needsCorrection: Bool = false) {
Update guidanceStatus‘s initialization by removing the needsCorrection argument:
let guidanceStatus = GuidanceSensorStatus(zAngularVelocityDegreesPerMinute: 2.2)
guidanceStatus.currentZAngularVelocityRadiansPerMinute // 0.038
guidanceStatus.needsCorrection // false
Introducing Two-Phase Initialization
So far, the code in your initializers have been setting up your properties and calling other initializers. That’s the first phase of initialization, but there are actually two phases to initializing a Swift type.
Phase 1 starts at the beginning of initialization and ends once all stored properties have been assigned a value. The remaining initialization execution is phase 2. You cannot use the instance you are initializing during phase 1, but you can use the instance during phase 2. If you have a chain of delegating initializers, phase 1 spans the call stack up to the non-delegating initializer. Phase 2 spans the return trip from the call stack.
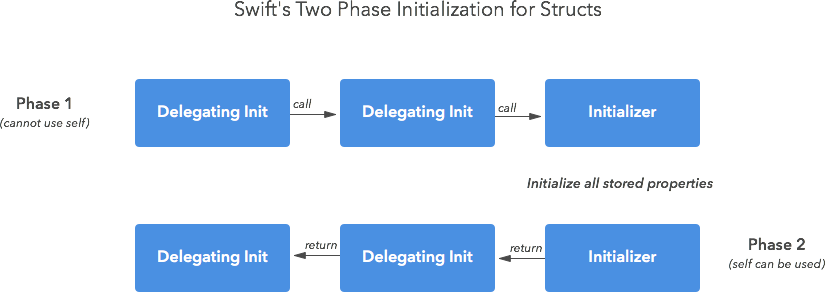
Putting Two-Phase Initialization to Work
▬▬▬▬▬▬▬▬▬▬ஜ۩۞۩ஜ▬▬▬▬▬▬▬▬▬▬▬▬▬▬
Now that you understand two-phase initialization, let’s apply it to our scenario. Each rocket engine has a combustion chamber where fuel is injected with oxidizer to create a controlled explosion that propels the rocket. Setting up these parameters is the phase 1 part to prepare for blastoff.
Implement the following CombustionChamberStatus struct to see Swift’s two-phase initialization in action. Make sure to show Xcode’s Debug area to see the output of the print statements.
1 | struct CombustionChamberStatus { |
CombustionChamberStatus(temperatureCelsius: 32, pressureAtmospheric: 0.96)
You should see the following output in the Debug Area:
1 | Phase 1 delegating init |
As you can see, phase 1 begins with the call to the delegating initializer init(temperatureCelsius:pressureAtmospheric:) during which self cannot be used. Phase 1 ends right after self.pressureKiloPascals gets assigned a value in the non-delegating initializer. Each initializer plays a role during each phase.
Isn’t the compiler super crazy smart? It knows how to enforce all these rules. At first, those rules might seem like nuisances, but remember that they provide a ton of safety.
What if Things Go Wrong?
You’ve been told the launch sequence will be fully autonomous, and that the sequence will perform a ton of tests to make sure all systems are good to go for launch. If an invalid value is passed into an initializer, the launch system should be able to know and react.
There are two ways to handle initialization failures in Swift: using failable initializers, and throwing from an initializer. Initialization can fail for many reasons, including invalid input, a missing system resource such as a file, and possible network failures.
Using Failable Initializers
如果传入的函数不符合初始化的要求,可以返回optional的初始化结果。对于不合格的初始化参数返回nil初始化失败。
There are two differences between normal initializers and failable initializers. One is that failable initializers return optional values, and the other is that failable initializers can return nil to express an initialization failure. This can be very useful — let’s apply it to the rocket’s tanks in our data model.
Each rocket stage carries two large tanks; one holds fuel, while the other holds oxidizer. To keep track of each tank, implement a new struct named TankStatus as follows:
1 | struct TankStatus { |
There’s nothing wrong with this code except that it doesn’t recognize failure. What happens if you pass in a negative volume? What if you pass in a positive volume value but no liquid type? These are all failure scenarios. How can you model these situatons using failable initializers?
Start by changing TankStatus‘s initializer to a failable initializer by appending a ? to init:
1 | init?(currentVolume: Double, currentLiquidType: String?) { |
Option-click on tankStatus and notice how the initializer now returns an optional TankStatus.
Update tankStatus‘s instantiation to match the following:
1 | if let tankStatus = TankStatus(currentVolume: 0.0, currentLiquidType: nil) { |
The instantiation logic checks for failure by evaluating whether the returned optional contains a value or not.
Of course, there’s something missing: the initializer isn’t actually checking for invalid values yet. Update the failable initializer to the following:
1 | init?(currentVolume: Double, currentLiquidType: String?) { |
As soon as an invalid input is detected, the failable initializer returns nil. You can return nil at any time within a structure’s failable initializer. This is not the case with a class’s failable initializer, as you’ll see in Part 2 of this tutorial.
To see instantiation failure, pass an invalid value into tankStatus‘s instantiation:
1 | if let tankStatus = TankStatus(currentVolume: -10.0, currentLiquidType: nil) { |
Notice how the playground prints, “Oh no, an initialization failure occurred.” Because initialization failed, the failable initializer returned a nil value and the if let statement executed the else clause.
Throwing From an Initializer
在初始化函数中抛出错误
Failable initializers are great when returning nil is an option. For more serious errors, the other way to handle failure is throwing from an initializer.
You have one last structure to implement: one to represent each astronaut. Start by writing the following code:
1 | struct Astronaut { |
The manager tells you an astronaut should have a non-empty String for his or her name property and should have an age ranging from 18 to 70.
To represent possible errors, add the following error enumeration before the implementation of Astronaut:
1 | enum InvalidAstronautDataError: Error { |
The enumeration cases here cover the possible problems you might run into when initializing a new Astronaut instance.
Next, replace the the Astronaut initializer with the following implementation:
1 | init(name: String, age: Int) throws { |
Note that the initializer is now marked as throws to let callers know to expect errors.
If an invalid input value is detected — either an empty string for the name, or an age outside the acceptable range — the initializer will now throw the appropriate error.
Try this out by instantiating a new astronaut:
1 | let johnny = try? Astronaut(name: "Johnny Cosmoseed", age: 42) |
This is exactly how you handle any old throwing method or function. Throwing initializers behave just like throwing methods and functions. You can also propagate throwing initializer errors, and handle errors with a do–catch statement. Nothing new here.
To see the initializer throw an error, change johnny‘s age to 17:
1 | let johnny = try? Astronaut(name: "Johnny Cosmoseed", age: 17) // nil |
When you call a throwing initializer, you write the try keyword — or the try? or try! variations — to identify that it can throw an error. In this case, you use try? so the value returned in the error case is nil. Notice how the value of johnny is nil. Seventeen is too young for spaceflight, sadly. Better luck next year, Johnny!
To Fail or to Throw?
Initializing using a throwing initializer and try? looks an awful lot like initializing with a failable initializer. So which should you use?
Consider using throwing initializers. Failable initializers can only express a binary failure/success situation. By using throwing initializers you can not only indicate failure, but also indicate a reason by throwing specific errors. Another benefit is that calling code can propagate any errors thrown by an initializer.
Failable initializers are much simpler though, since you don’t need to define an error type and you can avoid all those extra try? keywords.
Why does Swift even have failable initializers? Because the first version of Swift did not include throwing functions, so the language needed a way to manage initialization failures.
Progress is what gets us to Mars, so we can grow rocks.
Where To Go From Here?
Wow — you’re not only halfway through getting humans to Mars, you’re now a Swift structure initialization guru! You can download the final playground for Part 1 here.
To learn all about Swift class initialization, carry on to part 2 of this tutorial.
You can find more information about initialization in the initialization chapter of Apple’s The Swift Programming Language guide. If you have any questions or comments, please join the discussion in the forum below!